Message from the CTO

Message from the CTO

We’re all beginners at some stage

In writing my chapters of Professional DevExpress ASP.NET Controls, I suddenly realized that there is really no way anymore to know everything about the OS, the platform, the run-times, or the language we use in our daily work. Sure, way back in the days of MS-DOS 6.22, you stood some chance of knowing most of it, but nowadays, especially as we’re now learning more and more about Visual Studio 2010 and .NET 4, there’s no possibility to make the time to learn it all, let alone say you know it.

Given that axiom, surely it makes sense that, if we are to use some fancy new tech in our app, we should spend some time in learning about said tech? For example, I hadn’t actually written a web app that used AJAX before I wrote that part of the book. I could have just gone to our devs, thrown my weight around (it is considerable) and ordered them to make me an app or two and tell me how they did it, chop chop, but I decided to drop out and learn what it was all about through reading the documentation and writing some silly little throwaway apps.

Too often we don’t do that, and too often we get irritated that something doesn’t work the way we expect. Like everyone, I’d love for all software to be so intuitive that you don’t have to crack open the help, but that utopia is very much in the future. Heck, even some iPhone apps aren’t that intuitive.

The ability we should be cultivating within ourselves, then, is the ability to research, to experiment, and to learn about new software and not just take it on trust that we know innately how it works. This is the new job aptitude of the 21st century.
Julian M Bucknall, CTO
Comment on Julian’s message
Regular Expression Symbols

^ The start of a string.
$ The end of a string.
. Any character.
* Zero or more occurrences of the preceding.
\ Escape used for special characters or when searching for a specific  character that has another meaning in regular expression syntax. For example, to search for the period character, you would have to use “\ .” because the period means any character in regular expression syntax.

ASP.NET Validator Controls

CompareValidator Compares a value entered into a Web server control against another set value.
CustomValidator Can create your own custom validation for specific data.
RangeValidator Finds the range between two values on a Web  server control.
RegularExpressionValidator Uses regular expressions to validate a value  entered into a Web server control.
RequiredFieldValidator Ensures that all items are supplied data in a Web server control.
ValidationSummary Groups the result set of validation control error messages into a summary for viewing.

Creating a File-Upload User Control with ASP.NET

Introduction

This Program explains how to create a file-upload user control in ASP.NET. This will show how to save the uploaded file to disk without granting anonymous users file-write access to folders on your Web server. Finally, you’ll wrap all this in a new ASP.NET user control. This will allow you to add file upload capabilities to almost any Web page quickly and easily.

The .NET Framework offers the FileUpload control to simplify uploading files from web pages.

For this example, we will need to first import the System.Web.UI.WebControls namespace. The System.Web.UI.WebControls namespace contains the classes we need to extract the filename of the file we wish to upload.

using System.Web.UI.WebControls

1.Create a New Website in asp.net prepared language C#.

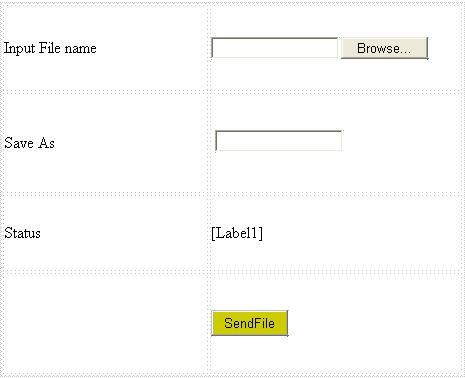
2.Add Controls to the Design page.untitled1

Now we can write C# code within the UploadFile method to save the uploaded file in the server. This code can be written in two ways depending on the number of file controls we have within the page. If there is only a single file control then we can use the PostedFile property of the file control to upload files. This property is of type HttpPostedFile class and contains the following methods and properties which aids file uploading.

Properties
Property Description
FileName Returns the full path and name of the uploaded file.
ContentType The MIME type of the uploaded file.
ContentLength The size in bytes of the uploaded file.
Method
Methods Description
SaveAs(Path) Saves the uploaded file to the specified path.

If we have multiple file controls within the form we can use the Files property of the Request object which returns a reference to the HttpFileCollection class. HttpFileCollection class has an Item property through which gets individual HttpPostedFile from the file collection either by specifying the name or index.

Finally, you need to add the event handler for the button click. This is the code that does the actual uploading of the file. Actually, there is very little code needed to do this. I

filename.PostedFile.SaveAs(sPath+savename.Value);

This line uses the name of the control (filename) and accesses the PostedFile object’s SaveAs method to pass the path and filename of the file to save. However, to make the control a bit more robust, you’ll add some server-side content checking and then some code to pull the actual file size, type, and location from the PostedFile object. Finally, you’ll wrap the call to the SaveAs method in a try…catch block and display an appropriate status message based on the results.Add the given code to Button1_Click method referred to in the OnServerClick attribute of the button control. Below is the complete code block for the event handler.


protected void Button1_Click(object sender, EventArgs e)
protected void Button1_Click(object sender, EventArgs e) { // make sure there is a file to upload if (SaveAs.Text == "") { Label1.Text = "Missing a 'save as' name."; }
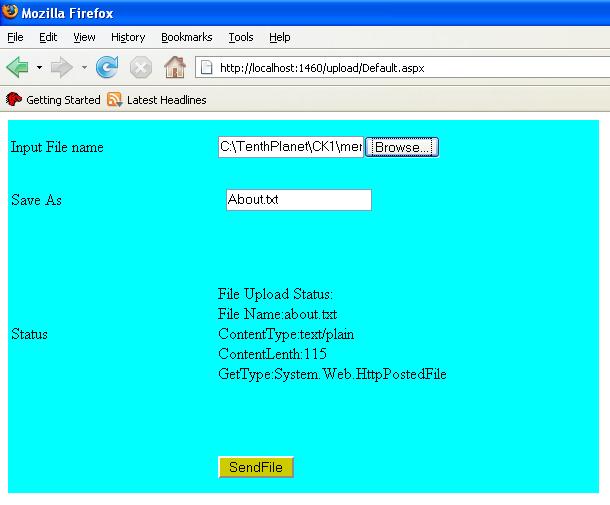
// try save the file to the Disk if (FileUpload1.PostedFile != null) { //build File information for display string path = UploadFolder; string info = "<br>File Name:" + FileUpload1.PostedFile.FileName + "<br>ContentType:" + FileUpload1.PostedFile.ContentType + "<br>ContentLenth:" + FileUpload1.PostedFile.ContentLength.ToString() + "<br>GetType:" +FileUpload1.PostedFile.GetType(); try { FileUpload1.PostedFile.SaveAs(path + SaveAS.Text); Label1.Text = "File Upload Status:" + info; } catch (Exception err) { Label1.Text="<br>Error:"+err; } } }

When you actually run the test page you can select a file, set the “SaveAs” name, and press the button to send the file to the server. If you’re successful, you’ll see a message like the one in the screenshot below.

Output Window

untitled

Master Page.

Master Pages enables you the developer to create a consistent look and feel for your web application. For most of us, we either create a header and footer on each and every webpage or we create a header and footer control and then add those controls to each and every .aspx page.

A master page is similar to a ‘.aspx’ page except that it has its own unique extension, ‘.master’. Furthermore, a master page contains a new ‘Master’ directive, along with a ContentPlaceHolder control

Master pages give your site a steady look and feel

Master pages contain both HTML and a code part and it create a common template that can be used on many pages

Updating the master page automatically updates all pages using it

A master page has 2 parts

  1. Content that appears on each page that inherits the master page
  2. Regions that can be customized by the pages inheriting the master page

Master pages can contain HTML, Web controls and server side source code

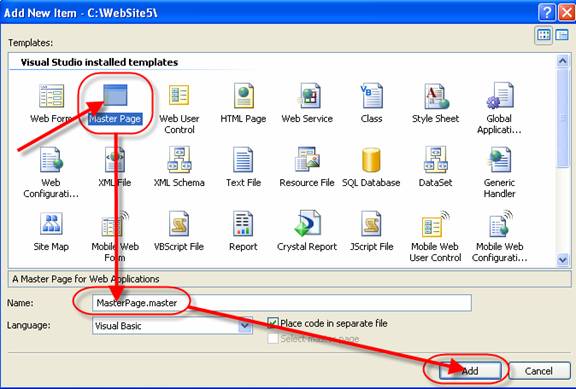
To Add a Master Page in the application follow the steps
1: Right Click Solution Explorer | Select Add New Item. This will give the following dialog box (see Figure 1):

Select Master Page and click Add. Master Page will be added to your website

workingMasterPages_clip_image003

Master pages end with .Master. By default visual studio names the master page masterPage.master

A Master page need to specify both the parts common to all pages and the parts that are customizable

Items you add to the master page appear on all pages that inherit it

Use contentPlaceHolder controls to specify a region that can be customized

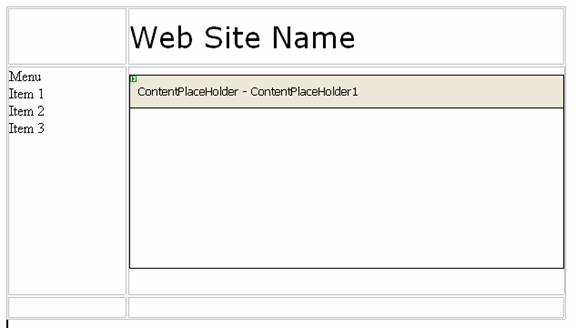
Add a table to the Master page

After creating the master page, notice that it looks like any other page, but it uses a new directive called <%@ Master %>:

<%@ Master Language="C#" 
   CompileWith="MasterPage.master.cs"
   AutoEventWireup="false" 
      ClassName="MasterPage_master" %>

You can also place default content within the ContentPlaceHolder:

<asp:contentplaceholder 
   id="BasicContentPlaceHolder" 
   runat="server">
   No default content specified
</asp:contentplaceholder>

workingMasterPages_clip_image007

It adds on ContentPlaceHolder by default

If you place controls outside the content placeholders they will be displayed on all pages

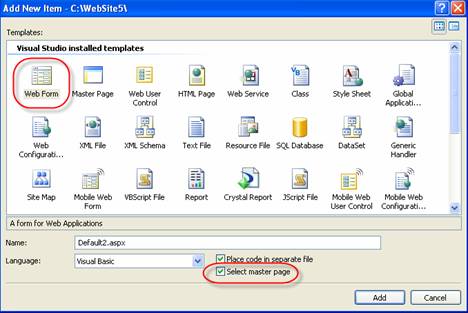
2.Right Click the Solution Explorer and select Add New Item and Select Web Form and Check Select Master Page

workingMasterPages_clip_image009

From the Select a Master Dialog, select the master page and click OK

  • Select the master page you created.

All masterpages in your site will appear

workingMasterPages_clip_image011

All is grayed out except the contentPlaceHolder control

You can only add controls to and modify inside the ContentPlaceHolder

You can only add controls to and modify inside the ContentPlaceHolder

The purpose of a master page is to define a template for the website

Master pages contain a default contentPlaceHolder control when you create